Using git at the command line
Setup your git profile
your git identity
If you are not sure if you have already set your git identity, you can check this running this command:
git config --global --listIf you identity is not set yet, you need to provide your name and email (we recommend to use the same email as used when setting your GitHub account):
git config --global user.name "your Full Name"
git config --global user.email "your Email"
Optional
Check that everything is correct:
git config --global --listModify everything at the same time:
git config --global --editSet your text editor:
git config --system core.editor nanoHere nano is used as example; you can choose most of the text editor you might have installed on your computer (atom, sublime, notepad++ …).
Problem with any of those steps? Check out Jenny Brian Happy git trouble shooting section
GitHub credentials
Normally if you have already used GitHub tokens your Operating System (Windows, MacOSX, …) should have cached the necessary credentials to log in to your GitHub account (necessary to be able to push (write) content to the remote repository).
Setting up your GitHub Token
You can find the latest guidelines on how to setup your personal GitHub token here
Choose a token name that is related to the machine you are using (not requires, but a good idea :) )
Set the expiration date to
90 daysWe recommend to select the following options:
- all repo actions
- workflow
- gist
- all user actions
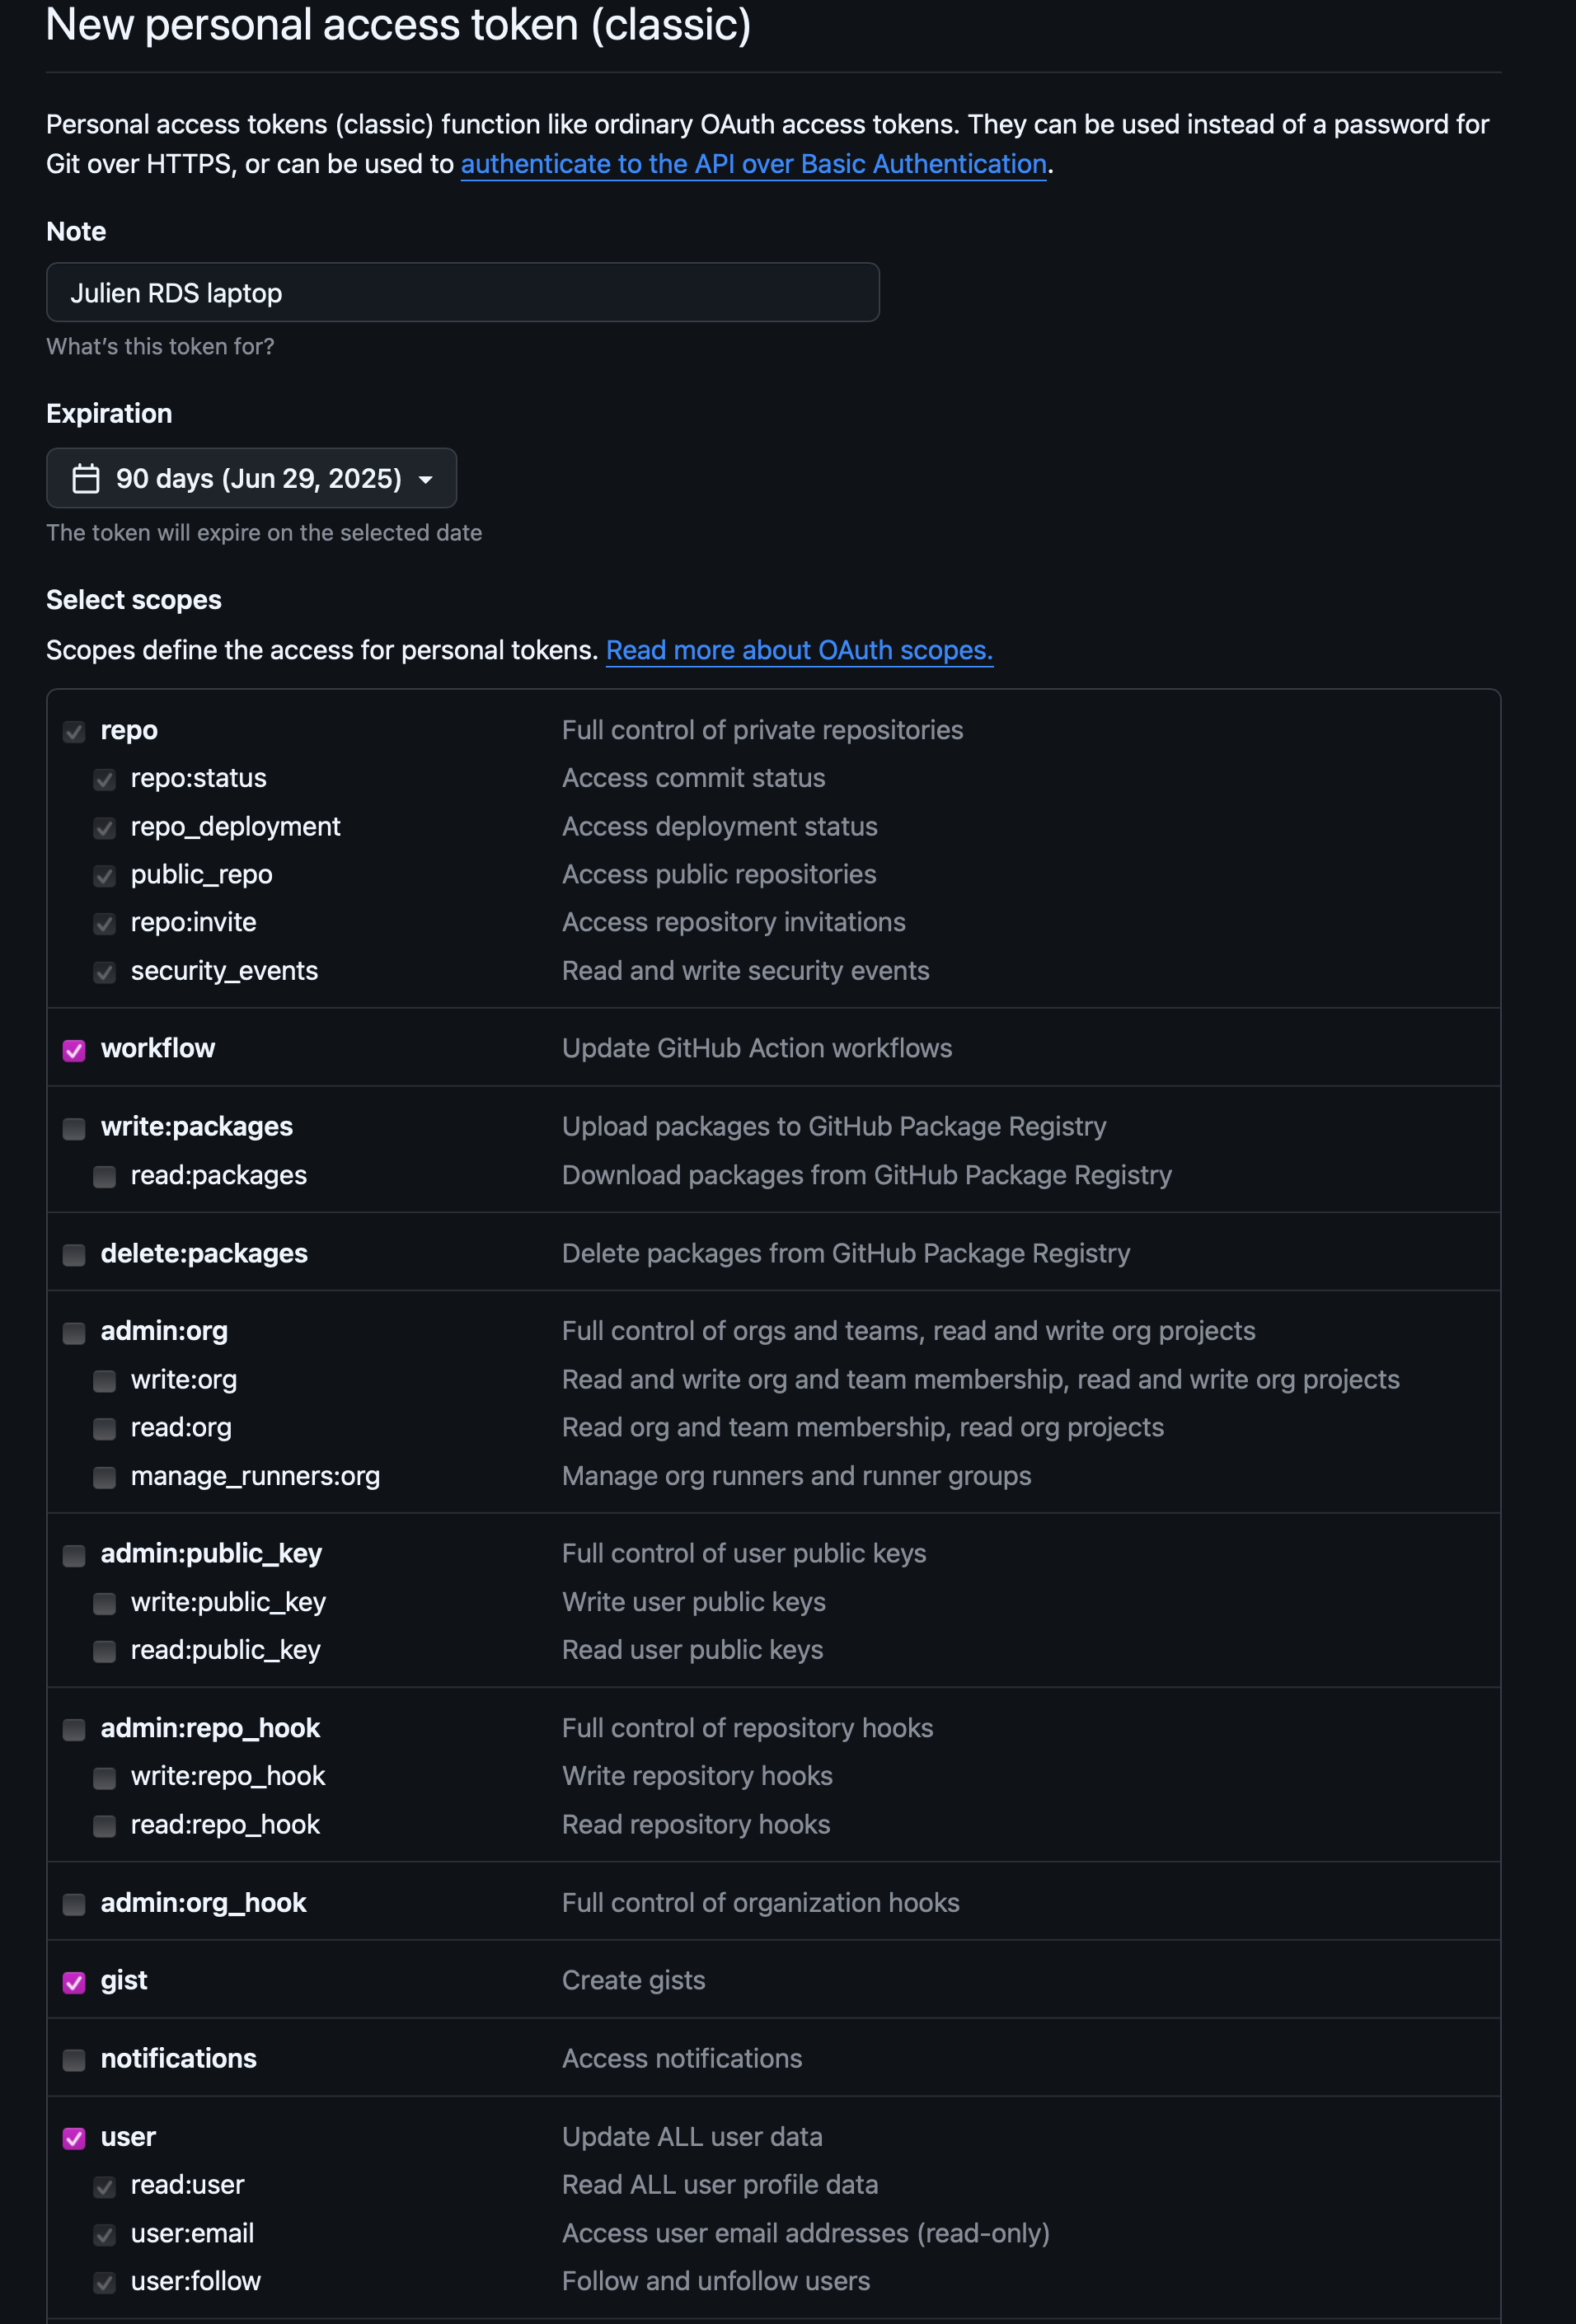
Then click the
Generate tokenbutton at the bottom of the page.
DO NOT CLOSE the next page as it will be the only time you can see your token.
Copy your token to your clipboard and then push to GitHub from the command line using git push. When you are prompted for your password, copy your token.
Only once it has worked and that your token as been cached by your OS password manager you can close the GitHub webpage displaying your token value.
Setting up your SSH key
Another option is to set up the method that is commonly used by many different services to authenticate access on the command line. This method is called Secure Shell Protocol (SSH). SSH is a cryptographic network protocol that allows secure communication between computers using an otherwise insecure network.
SSH uses what is called a key pair. This is two keys that work together to validate access. One key is publicly known and called the public key, and the other key called the private key is kept private. Very descriptive names.
You can think of the public key as a padlock, and only you have the key (the private key) to open it. You use the public key where you want a secure method of communication, such as your GitHub account. You give this padlock, or public key, to GitHub and say “lock the communications to my account with this so that only computers that have my private key can unlock communications and send git commands as my GitHub account.”
The first thing we are going to do is check if this has already been done on the computer you’re on. Because generally speaking, this setup only needs to happen once and then you can forget about it:
ls -al ~/.sshYour output is going to look a little different depending on whether or not SSH has ever been set up on the computer you are using.
Already set up:
If SSH has been set up on the computer you’re using, the public and private key pairs will be listed. The file names are either id_ed25519/id_ed25519.pub or id_rsa/id_rsa.pub depending on how the key pairs were set up.
Not Set up:
ls: cannot access '/Users/brunj7/.ssh': No such file or directoryCreate an SSH key pair
To create an SSH key pair Vlad uses this command, where the -t option specifies which type of algorithm to use and -C attaches a comment to the key (here, Vlad’s email):
$ ssh-keygen -t ed25519 -C "youremail@provider.org"If you are using a legacy system that doesn’t support the Ed25519 algorithm, use:
$ ssh-keygen -t rsa -b 4096 -C "your_email@example.com"
Generating public/private ed25519 key pair.
Enter file in which to save the key (/Users/brunj7/.ssh/id_ed25519):
We want to use the default file, so just press Enter.
Created directory '/Users/brunj7/.ssh'.
Enter passphrase (empty for no passphrase):
Now, it is prompting you for a passphrase. Be sure to use something memorable or save your passphrase somewhere, as there is no “reset my password” option.
When you enter password at the shell, the keystrokes do not produce the usual “dot” showing you that you are typing, but your keystrokes are being registered… so keep typing you password !!
Enter same passphrase again:After entering the same passphrase a second time, we receive the confirmation
Your identification has been saved in /Users/brunj7/.ssh/id_ed25519
Your public key has been saved in /Users/brunj7/.ssh/id_ed25519.pub
The key fingerprint is:
SHA256:SMSPIStNyA00KPxuYu94KpZgRAYjgt9g4BA4kFy3g1o vlad@tran.sylvan.ia
The key's randomart image is:
+--[ED25519 256]--+
|^B== o.          |
|%*=.*.+          |
|+=.E =.+         |
| .=.+.o..        |
|....  . S        |
|.+ o             |
|+ =              |
|.o.o             |
|oo+.             |
+----[SHA256]-----+
The “identification” is actually the private key. You should never share it. The public key is appropriately named. The “key fingerprint” is a shorter version of a public key.
Now that we have generated the SSH keys, we will find the SSH files when we check.
ls -al ~/.sshdrwxr-xr-x 1 brunj7 staff 197121 Oct 23 13:14 ./
drwxr-xr-x 1 brunj7 staff 197121 Mar 11 09:21 ../
-rw------- 1 brunj7 staff 464 Apr 21 2023 id_ed25519
-rw-r--r-- 1 brunj7 staff 103 Apr 21 2023 id_ed25519.pubClone a repository
If you not have yet your favorite-desserts GitHub repository, please follow those steps
Navigate to the folder (e.g cd ~/Documents) where you want to save your repository and run the following command:
git clone https://github.com/brunj7/favorite-desserts.gitYou should have a new folder on your local machine named favorite-desserts after your repository :
lsGo inside the repository:
cd favorite-desserts
ls -al
This should return the exact same content that is currently on GitHub!
Tracking your work
Let’s create a text file called index.md and add it to our repository. The file will later be converted into a webpage by GitHub pages. We’ll write the file using a syntax called Markdown, which is why we use the .md extensions.
We’ll use nano to edit the file; you can use whatever editor you like. In particular, this does not have to be the core.editor you set globally earlier. But remember, the bash command to create or edit a new file will depend on the editor you choose (it might not be nano). For a refresher on text editors, check out “Which Editor?” in The Unix Shell lesson.
nano index.mdType the text below, replacing the names with people you know:
## Listing of my favorite desserts

- Julien, crepes
Exit nano and save your changes.
Check it worked:
$ cat index.mdYou should see the content you just typed!
If we check the status of our project again, Git tells us that it’s noticed the new file:
$ git statusOn branch main
No commits yet
Untracked files:
(use "git add <file>..." to include in what will be committed)
index.md
nothing added to commit but untracked files present (use "git add" to track)The “untracked files” message means that there’s a file in the directory that Git isn’t keeping track of. We can tell Git to track a file using git add:
$ git add index.mdand then check that the right thing happened:
$ git statusOn branch main
No commits yet
Changes to be committed:
(use "git rm --cached <file>..." to unstage)
new file: index.md
Git now knows that it’s supposed to keep track of index.md, but it hasn’t recorded these changes as a commit yet. To get it to do that, we need to run one more command:
$ git commit -m "start new webpage"[main (root-commit) f22b25e] Start new webpage
1 file changed, 1 insertion(+)
create mode 100644 index.mdWhen we run git commit, Git takes everything we have told it to save by using git add and stores a copy permanently inside the special .git directory. This permanent copy is called a commit (revision) and its short identifier is f22b25e. Your commit may have another identifier.
We use the -m flag (for “message”) to record a short, descriptive, and specific comment that will help us remember later on what we did and why. If we just run git commit without the -m option, Git will launch nano (or whatever other editor we configured as core.editor) so that we can write a longer message.
Good commit messages start with a brief (<50 characters) statement about the changes made in the commit. Generally, the message should complete the sentence “If applied, this commit will”
If we run git status now:
$ git statusOn branch main
nothing to commit, working tree cleanit tells us everything is up to date. If we want to know what we’ve done recently, we can ask Git to show us the project’s history using git log:
$ git logcommit f22b25e3233b4645dabd0d81e651fe074bd8e73b
Author: ...
Date: Thu Aug 22 09:51:46 2013 -0400
start new webpagegit log lists all commits made to a repository in reverse chronological order. The listing for each commit includes the commit’s full identifier (which starts with the same characters as the short identifier printed by the git commit command earlier), the commit’s author, when it was created, and the log message Git was given when the commit was created.
If we run ls at this point, we will still see just one file called index.md. That’s because Git saves information about files’ history in the special .git directory mentioned earlier so that our filesystem doesn’t become cluttered (and so that we can’t accidentally edit or delete an old version).
Let’s adds more information to the file. (Again, we’ll edit with nano and then cat the file to show its contents; you may use a different editor, and don’t need to cat.)
$ nano index.md## Listing of my favorite desserts
- Julien, crepes
- Sophia, chocolate
When we run git status now, it tells us that a file it already knows about has been modified:
$ git statusOn branch main
Changes not staged for commit:
(use "git add <file>..." to update what will be committed)
(use "git checkout -- <file>..." to discard changes in working directory)
modified: index.md
no changes added to commit (use "git add" and/or "git commit -a")The last line is the key phrase: “no changes added to commit”.
We have changed this file, but we haven’t told Git we will want to save those changes (which we do with git add) nor have we saved them (which we do with git commit). So let’s do that now. It is good practice to always review our changes before saving them. We do this using git diff.
This shows us the differences between the current state of the file and the most recently saved version:
$ git diffdiff --git a/index.md b/index.md
index 7d781a7..bbb33fe 100644
--- a/index.md
+++ b/index.md
@@ -1 +1,3 @@
## Listing of my favorite desserts
- Julien, crepes
+ - Sophia, chocolate
The output is cryptic because it is actually a series of commands for tools like editors and patch telling them how to reconstruct one file given the other. If we break it down into pieces:
- The first line tells us that Git is producing output similar to the Unix
diffcommand comparing the old and new versions of the file. - The second line tells exactly which versions of the file Git is comparing;
7d781a7andbbb33feare unique computer-generated labels for those versions. - The third and fourth lines once again show the name of the file being changed.
- The remaining lines are the most interesting, they show us the actual differences and the lines on which they occur. In particular, the
+marker in the first column shows where we added a line.
After reviewing our change, it’s time to commit it:
$ git commit -m "add Sophia"On branch main
Changes not staged for commit:
(use "git add <file>..." to update what will be committed)
(use "git checkout -- <file>..." to discard changes in working directory)
modified: index.md
no changes added to commit (use "git add" and/or "git commit -a")Whoops: Git won’t commit because we didn’t use git add first. Let’s fix that:
$ git add index.md
$ git commit -m "add Sophia"
[main 019f377] add Sophia
1 file changed, 1 insertions(+)Git insists that we add files to the set we want to commit before actually committing anything. This allows us to commit our changes in stages and capture changes in logical portions rather than only large batches. For example, suppose we’re adding a few citations to relevant research to our thesis. We might want to commit those additions, and the corresponding bibliography entries, but not commit some of our work drafting the conclusion (which we haven’t finished yet).
To allow for this, Git has a special staging area where it keeps track of things that have been added to the current changeset but not yet committed.
Exploring git history
You can look at the history of what we’ve done so far:
$ git logIt should look something like this:
commit d11d7e52ab98d3d4c18cde4c4a0bbeea3fe40983 (HEAD -> main)
Author: ...
Date:   Thu Oct 19 12:07:51 2023 -0400

    add Sophia

commit 019f37773f9f18b77f508990df65e56a34df45de
Author: ...
Date:   Thu Oct 19 12:03:04 2023 -0400

    start new webpage

commit 8defaab26aa641a4233896ec68e603c541aa77b4
Author: ...
Date:   Thu Oct 19 12:01:17 2023 -0400

    intial commit
Paging the Log
When the output of git log is too long to fit in your screen, git uses a program to split it into pages of the size of your screen. When this “pager” is called, you will notice that the last line in your screen is a :, instead of your usual prompt.
- To get out of the pager, press Q.
- To move to the next page, press Spacebar.
- To search for
some_wordin all pages, press / and typesome_word. Navigate through matches pressing N.
To avoid having git log cover your entire terminal screen, you can limit the number of commits that Git lists by using -N, where N is the number of commits that you want to view. For example, if you only want information from the last commit you can use:
$ git log -1commit d11d7e52ab98d3d4c18cde4c4a0bbeea3fe40983 (HEAD -> main)
Author: ...
Date: Thu Oct 19 12:07:51 2023 -0400
add SophiaYou can also reduce the quantity of information using the --oneline option:
$ git log --onelined11d7e5 (HEAD -> main) add Sophia
019f377 start new webpage
8defaab initial commitYou can also combine the --oneline option with others. One useful combination adds --graph to display the commit history as a text-based graph and to indicate which commits are associated with the current HEAD, the current branch main, or [other Git references][git-references]:
$ git log --oneline --graph* d11d7e5 (HEAD -> main) add Sophia
* 019f377 start new webpage
* 8defaab initial commitSending changes back to GitHub
Now that we have created these two commits on our local machine, our local version of the repository is different from the version on GitHub. You can see this when running git status at the beginning of the message you should have “Your branch is ahead of ‘origin/master’ by two commits”. This can be translated as you have two additional commits on your local machine that you never shared back to the remote repository on GitHub. Open your favorite web browser and look at the content of your repository on GitHub. You will see there is no index.md file on GitHub.
There are two git commands to exchange between local and remote versions of a repository:
pull: git will get the latest remote (GitHub in our case) version and try to merge it with your local versionpush: git will send your local version to the remote version of the repository
Before sending your local version to the remote, you should always get the latest remote version first. In other words, you should pull first and push second. This is the way git protects the remote version against incompatibilities with the local version. You always deal with potential problems on your local machine. Therefore your sequence will always be:
pullpush
Let’s do it:
git pullNormally nothing should have changed on the remote
Now we can push our changes to GitHub:
git pushRefresh the repository webpage, you should now see the index.md file!
Aknowledgements
This section is adapted from Seth Erickson’s version of the Software Carpentry introduction to git
